基于MQTT协议的微信小程序与ESP32通信
00 前言
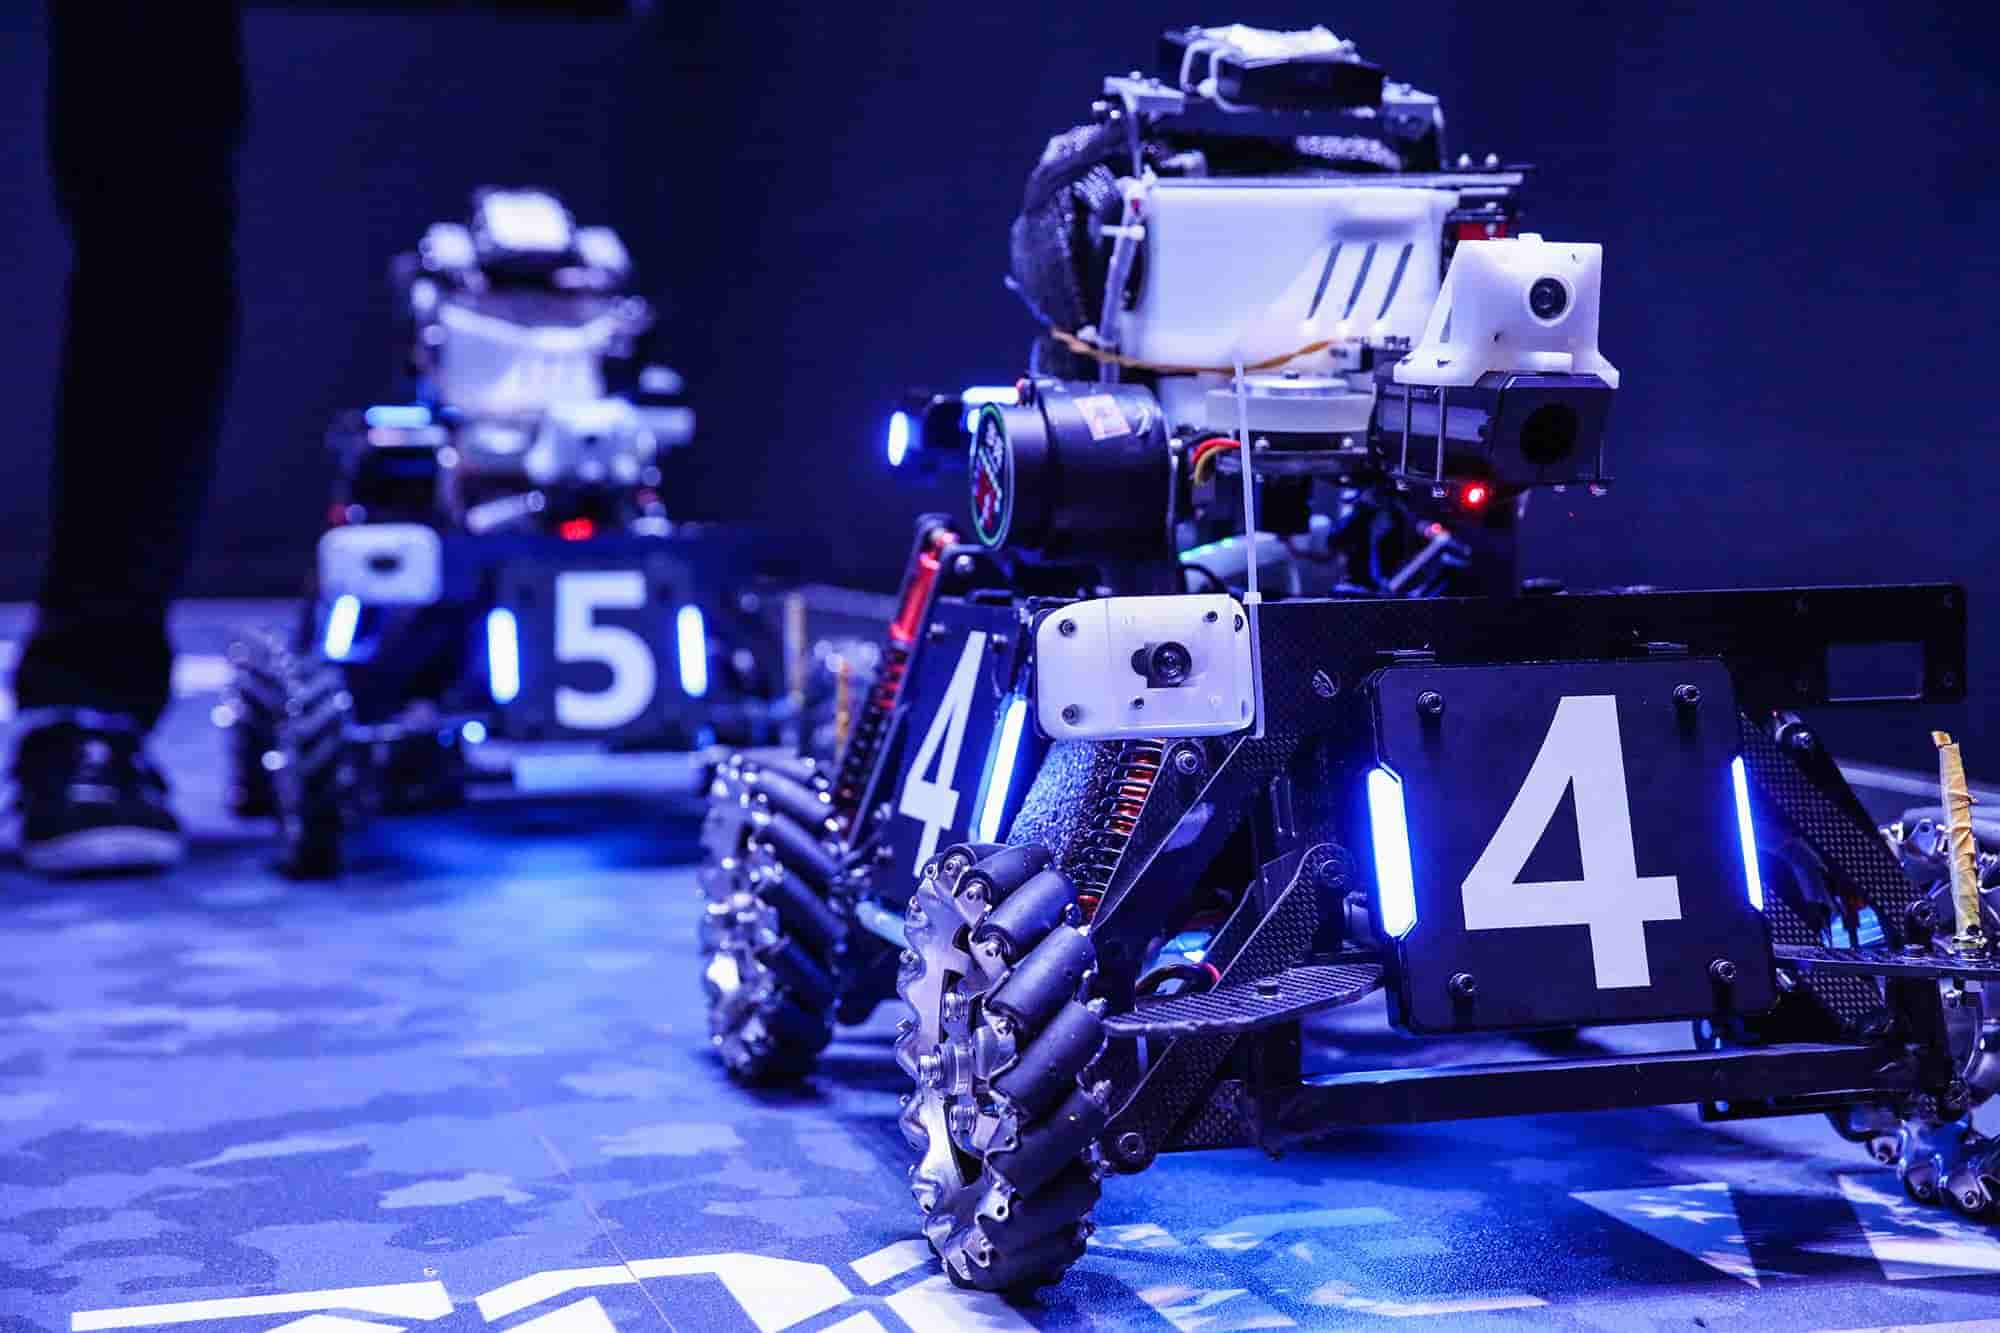
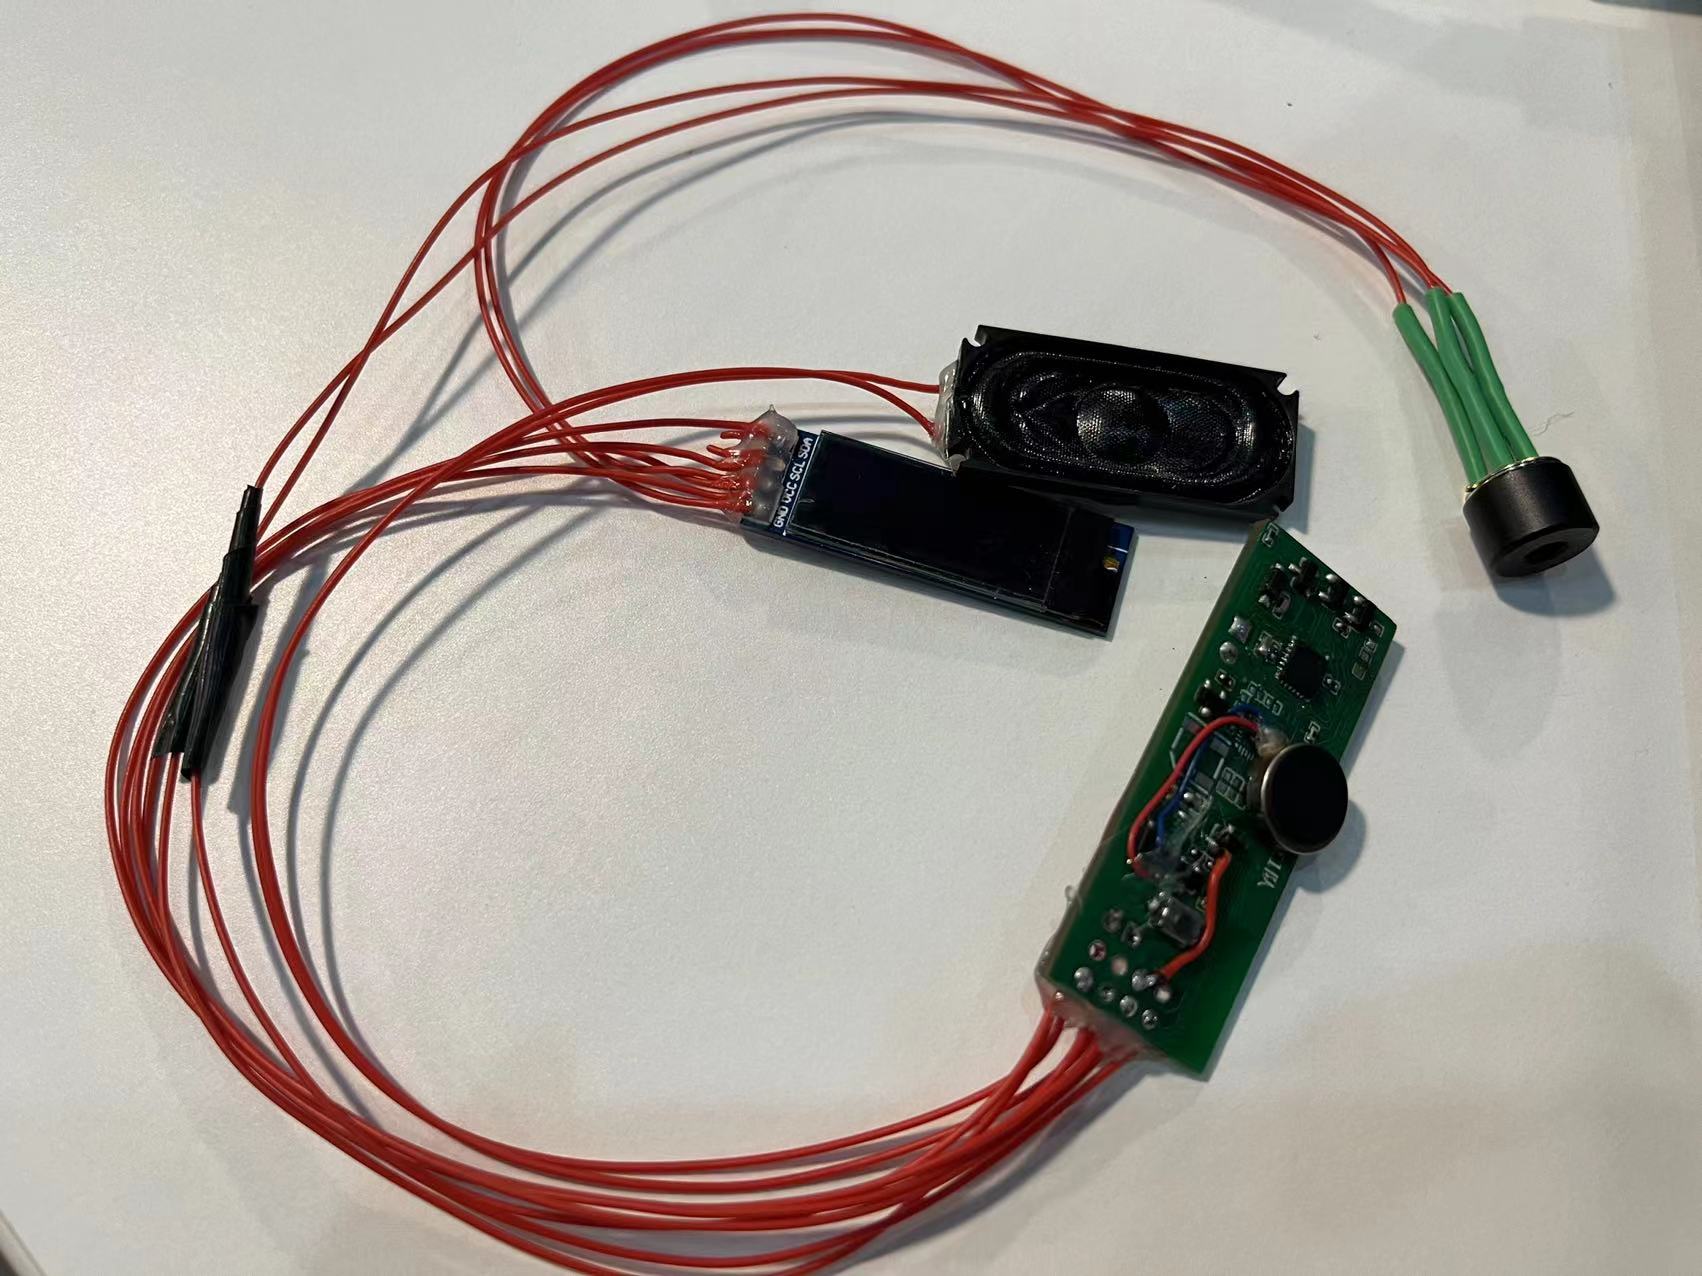
营期1月13日到1月28日,现在已经25号了,马上结束了,目前初代机已经完成制作啦。
我们组选定的主题是智慧锅铲😂,目的是让想要学做菜的人通过小程序选择菜式,然后语音交互进行教学,到达时间会震动提醒以及语音提醒进行下一步的制作。
成品制作从23号开始,截止到现在做了三天了,和北科小伙伴合作的非常nice,我负责的是微信小程序和通信这一部分,北科小伙伴负责画板子、焊接和控制部分。合作很开心。这篇博文主要记录一下通信部分。
01 关于MQTT协议
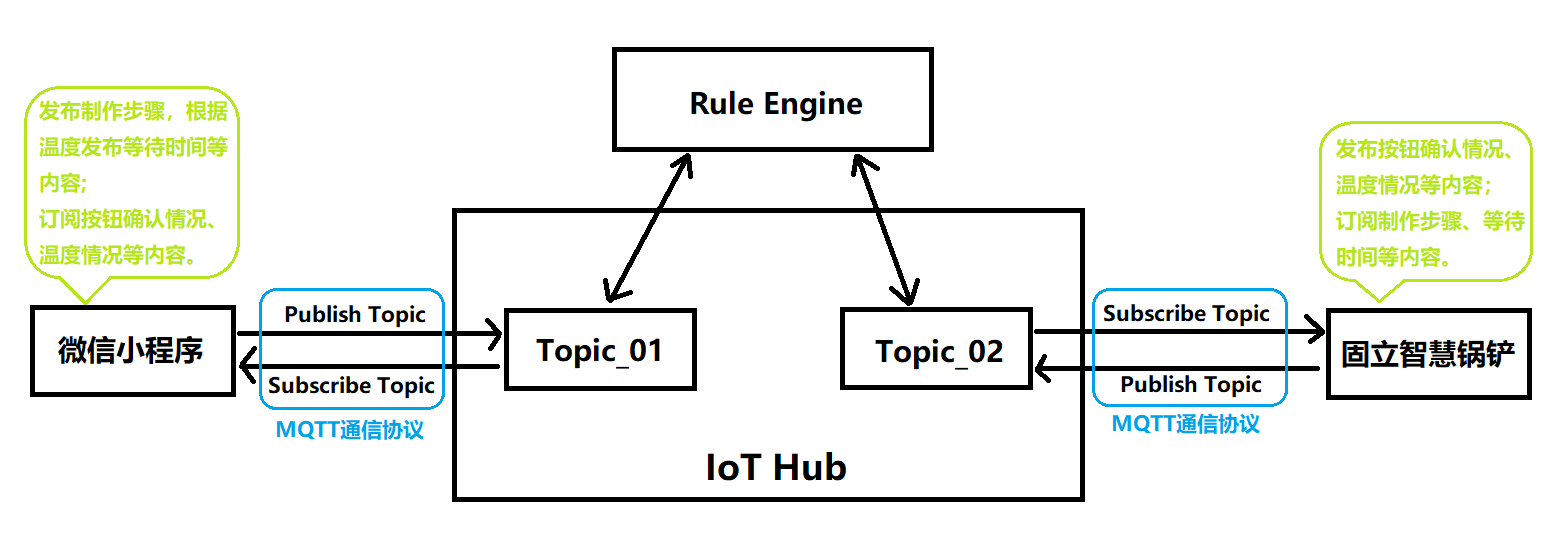
MQTT是一种基于 发布/订阅 模式的 轻量级 通信协议,由IBM于1999年发布。MQTT专门针对物联网设备开发,是一种低开销、低带宽占用的即时通讯协议。该协议构建于 TCP/IP 协议上,旨在为低带宽和不稳定网络环境中的物联网设备,提供可靠的网络服务。它的设计思想是简单、开放、规范,易于实现,这些特点使其非常适合 机器间通信(M2M)、物联网(IoT)等场景。
02 本项目的通信原理图
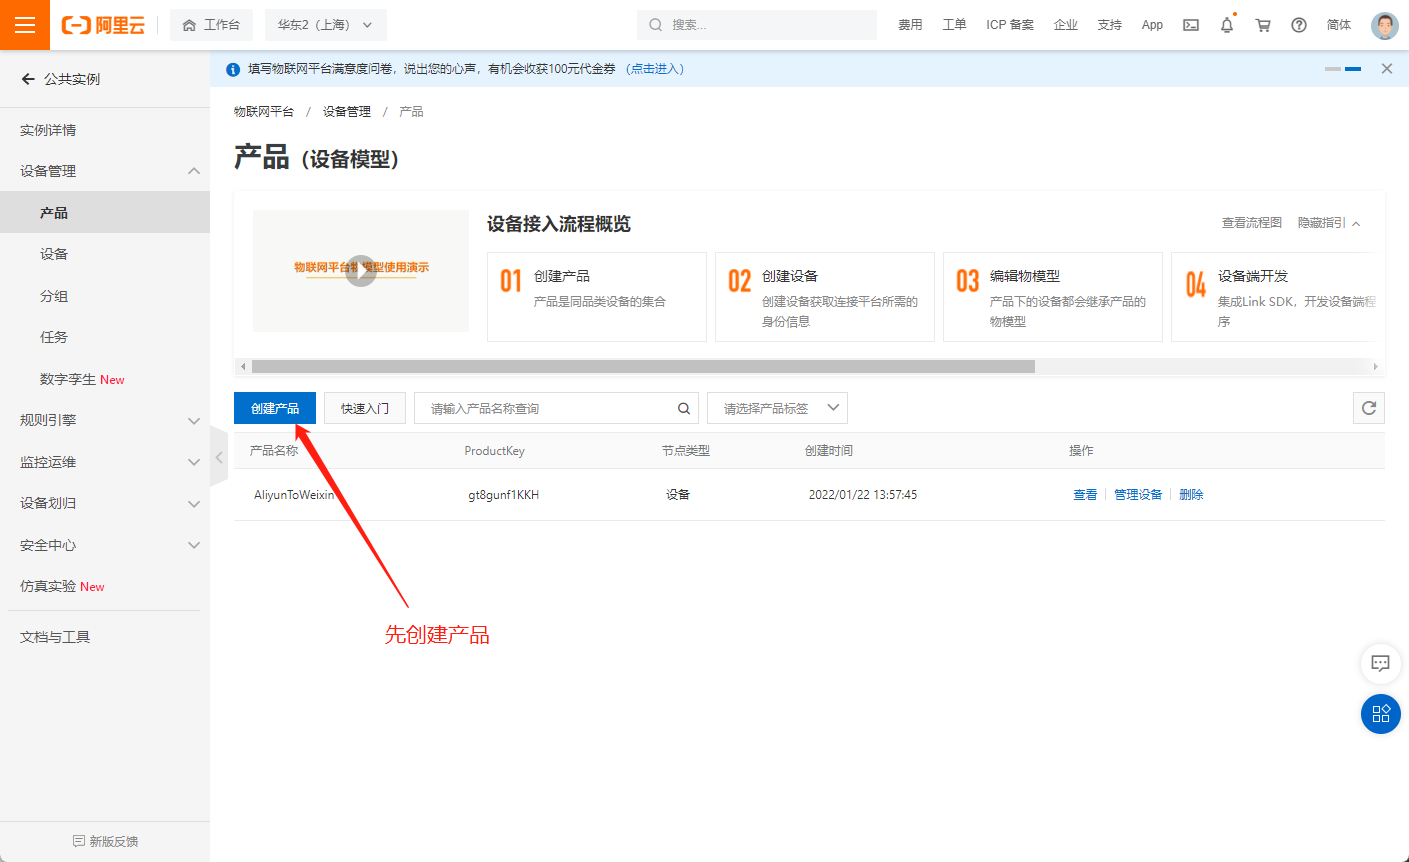
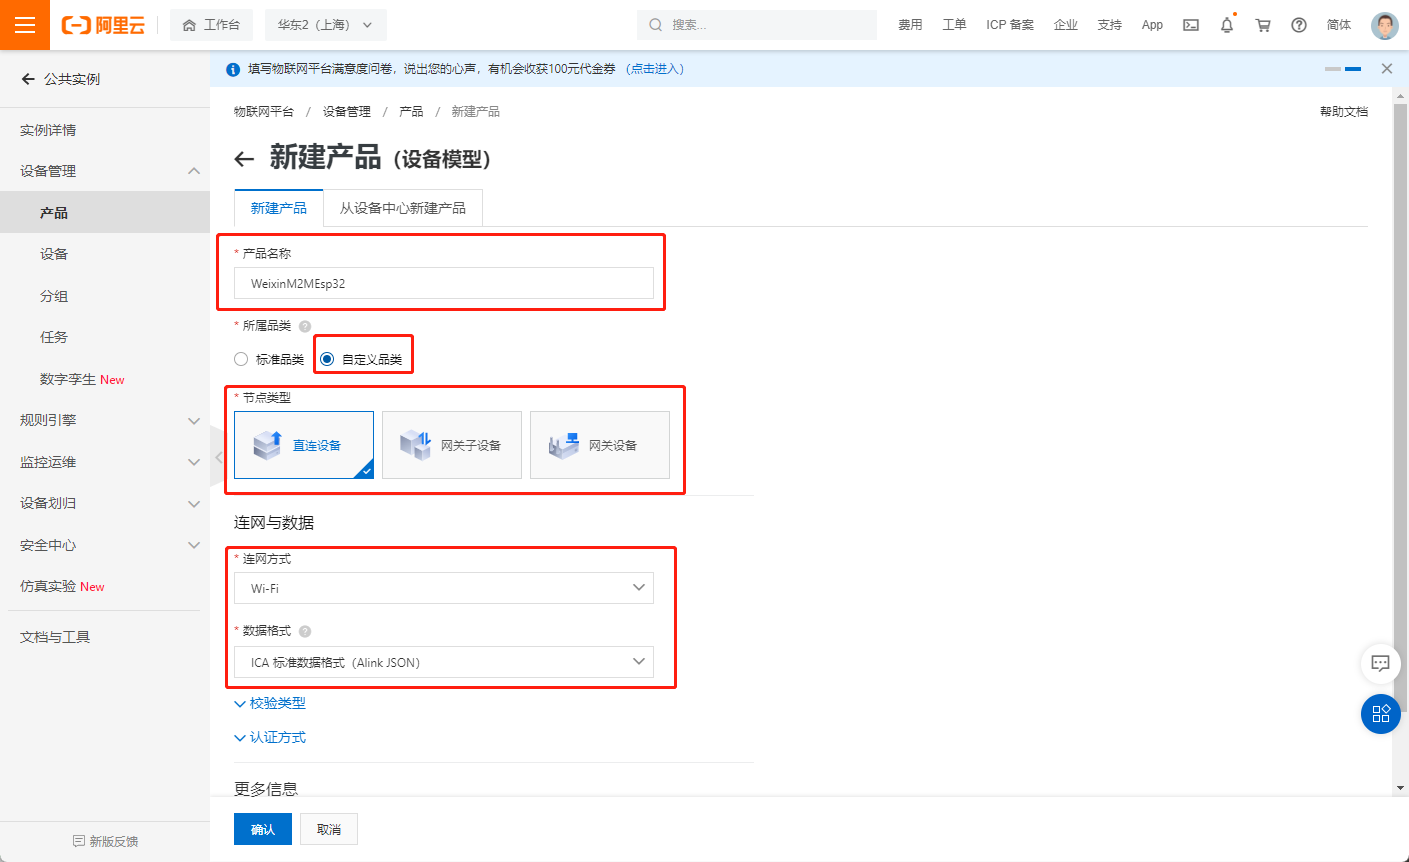
03 阿里云物联网新建产品
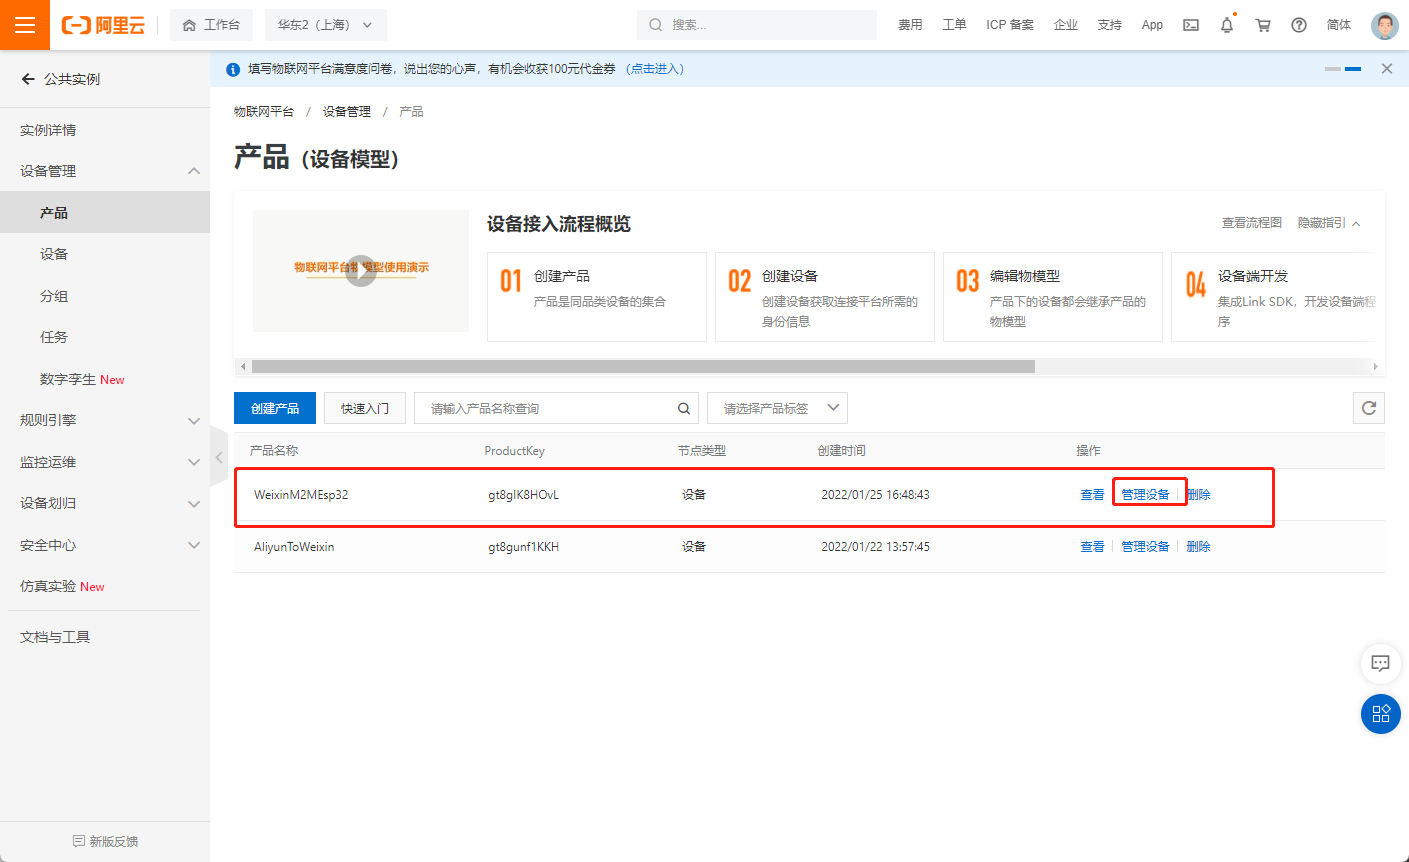
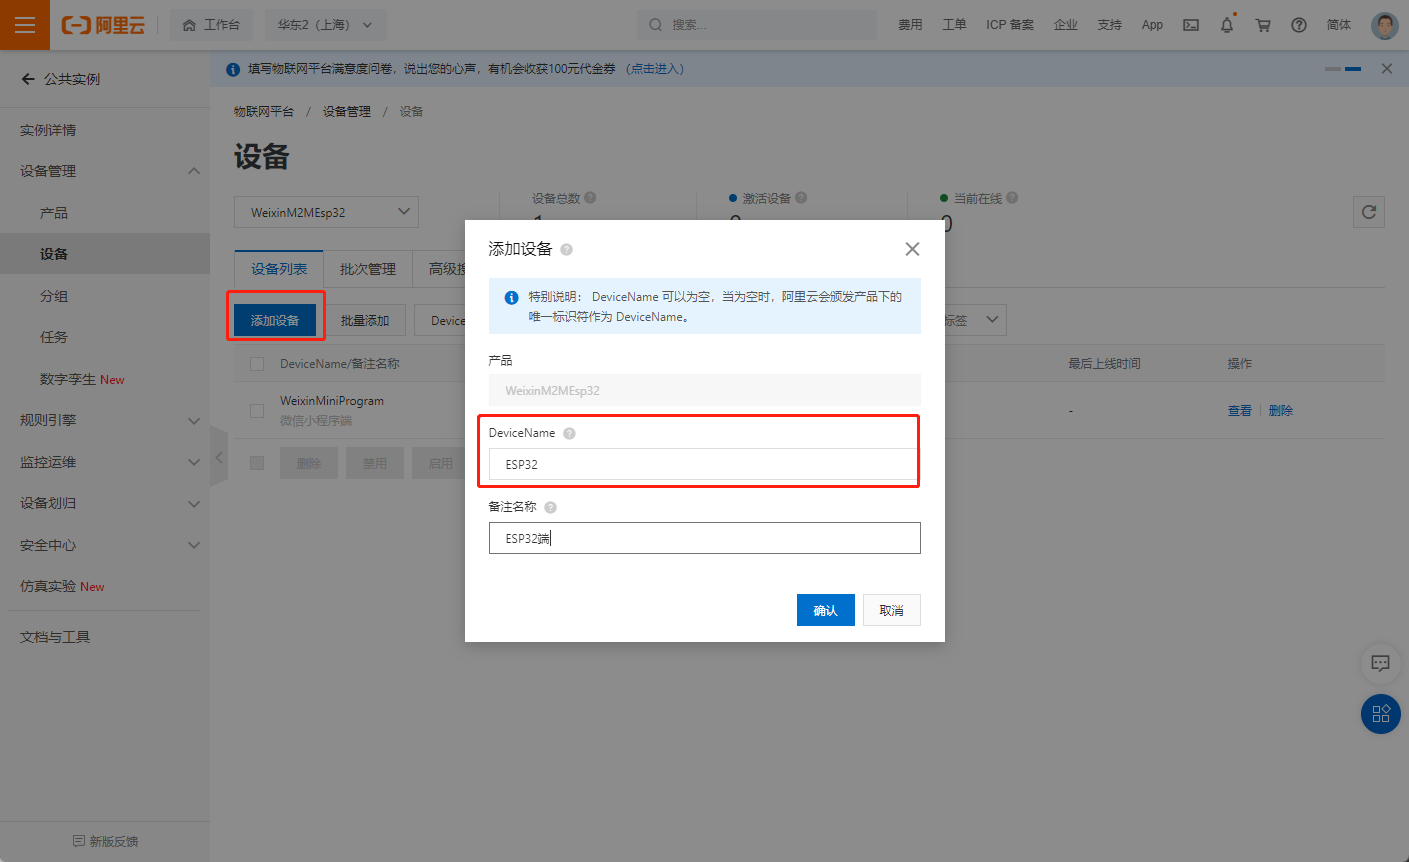
04 在产品中新建设备
然后在该产品下新建两个设备,即你要通信的两个设备,比如我这里是需要对ESP32和微信小程序进行通信
选择刚刚新建的产品,然后点击管理设备
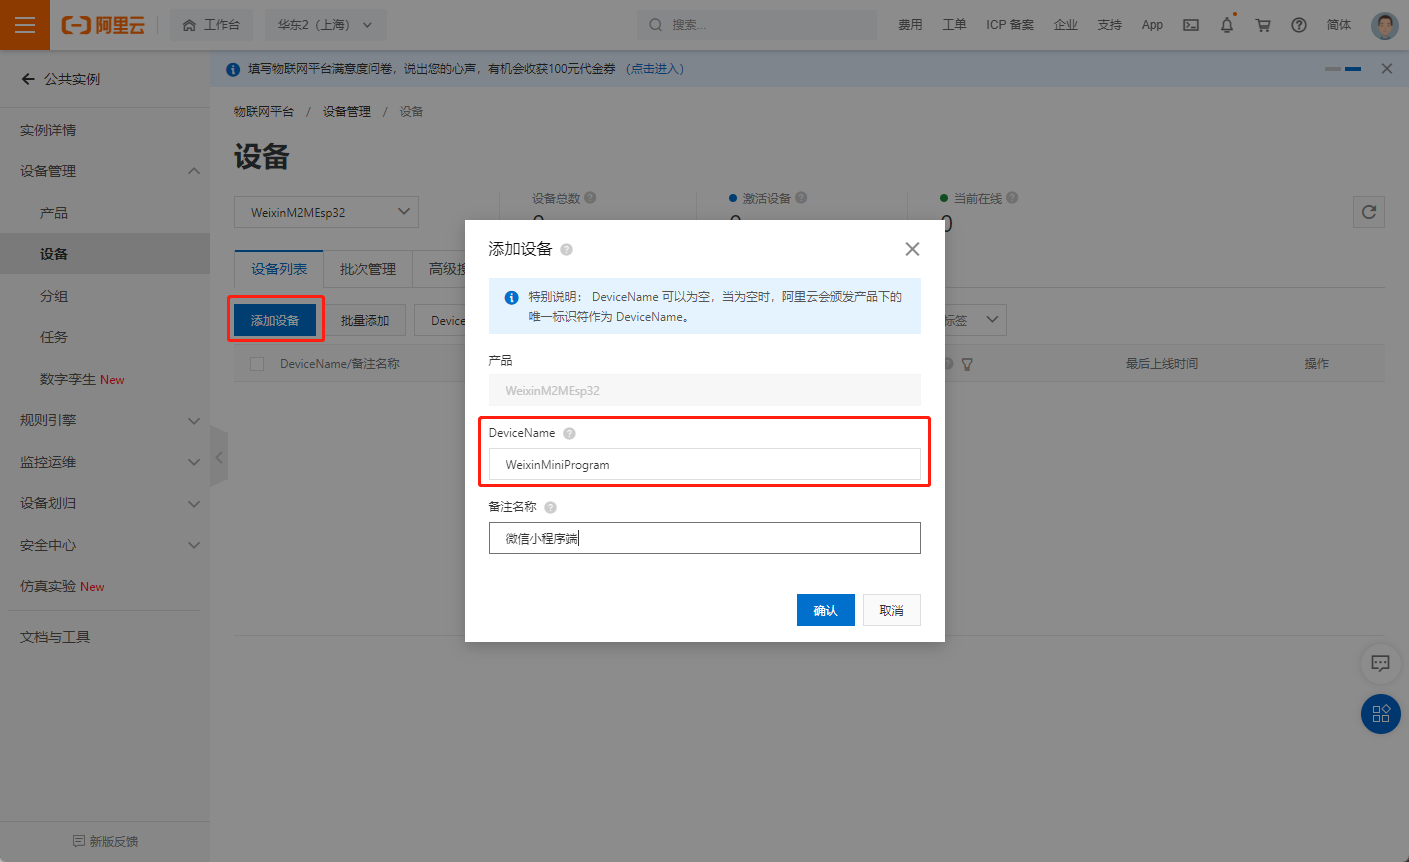
新建设备
05 ESP32连接阿里云
首先先让ESP32连接上阿里云物联网
首先需要安装四个第三方库,分别是ArduinoJson.zip、Crypto.zip、PubSubClient和VarSpeedServo-master.zip。
然后代码如下,主要部分是1
2
3
4
5
6
7
8
9
10
11
12
13
14
15
16
17
18
19
20
21
22
23
24
25
26
27
28
29
30
31
32
33
34
35
36
37
38
39
40
41
42
43
44
45
46
47
48
49
50
51
52
53
54
55
56
57
58
59
60
61
62
63
64
65
66
67
68
69
70
71
72
73
74
75
76
77
78
79
80
81
82
83
84
85
86
87
88
89
90
91
92
93
94
95
96
97
98
99
100
101
102
103
104
105
106
107
108
109
110
111
112
113
114
115
116
117
118
119
120
121
122
123
124
125
126
127
128
129
130
131
132
133
134
135
136
137
138
139
140
141
142
143
144
145
146
147
148
149
150
151
152
153
154
155
156
157
158
159
160
161
162
163
164
165
166
167
168
169
170
171
172
173
174
175
176
177
178
179
180
181
182
183
184
185
186
187
188
189
190
191
192
193
194
195
196
197
198
199
200
201
202
203
204
205
206
207
208
209
210
211
212
213
214
215
216
217
218
219
220
221
222
223
224
225
226
227
228
229
230
231
232
233
234
235
236
237
238
239
240
241
242
243
244
245
246
247
248
249
250
251
252
253
254
255
256
257
258
259
260
261
262
263
264
265
266
267
268
269
std::string WIFI_SSID = "Public"; // wifi名
std::string WIFI_PASSWD = ""; // wifi密码
int count = 0;
BLEServer *pServer = NULL;
BLECharacteristic *pTxCharacteristic;
bool deviceConnected = false;
bool oldDeviceConnected = false;
uint8_t txValue = 0;
// See the following for generating UUIDs:
// https://www.uuidgenerator.net/
class MyServerCallbacks : public BLEServerCallbacks
{
void onConnect(BLEServer *pServer)
{
deviceConnected = true;
};
void onDisconnect(BLEServer *pServer)
{
deviceConnected = false;
}
};
class MyCallbacks : public BLECharacteristicCallbacks
{
void onWrite(BLECharacteristic *pCharacteristic)
{
std::string rxValue = pCharacteristic->getValue();
if (rxValue.length() > 0)
{
Serial.println("*********");
Serial.print("Received Value: ");
count++;
if (count == 1)
{
WIFI_SSID = rxValue;
}
else if (count == 2)
{
WIFI_PASSWD = rxValue;
}
Serial.printf("count:%d\r\n", count);
Serial.printf("SSID:%s\r\n", WIFI_SSID.c_str());
Serial.printf("PWD:%s\r\n", WIFI_PASSWD.c_str());
Serial.println();
Serial.println("*********");
}
}
};
void bleSetup(void)
{
// Create the BLE Device
BLEDevice::init("Kitchenware");
// Create the BLE Server
pServer = BLEDevice::createServer();
pServer->setCallbacks(new MyServerCallbacks());
// Create the BLE Service
BLEService *pService = pServer->createService(SERVICE_UUID);
// Create a BLE Characteristic
pTxCharacteristic = pService->createCharacteristic(
CHARACTERISTIC_UUID_TX,
BLECharacteristic::PROPERTY_NOTIFY);
pTxCharacteristic->addDescriptor(new BLE2902());
BLECharacteristic *pRxCharacteristic = pService->createCharacteristic(
CHARACTERISTIC_UUID_RX,
BLECharacteristic::PROPERTY_WRITE);
pRxCharacteristic->setCallbacks(new MyCallbacks());
// Start the service
pService->start();
// Start advertising
pServer->getAdvertising()->start();
Serial.println("Waiting a client connection to notify...");
}
void bleLoop()
{
if (deviceConnected)
{
pTxCharacteristic->setValue(&txValue, 1);
pTxCharacteristic->notify();
txValue++;
delay(10); // bluetooth stack will go into congestion, if too many packets are sent
}
// disconnecting
if (!deviceConnected && oldDeviceConnected)
{
delay(500); // give the bluetooth stack the chance to get things ready
pServer->startAdvertising(); // restart advertising
Serial.println("start advertising");
oldDeviceConnected = deviceConnected;
}
// connecting
if (deviceConnected && !oldDeviceConnected)
{
// do stuff here on connecting
oldDeviceConnected = deviceConnected;
}
}
/*-----------------------------------------------------------------*/
//设备下发命令的set主题
//设备上传数据的post主题
//设备post上传数据要用到一个json字符串, 这个是拼接postJson用到的一个字符串
//这是post上传数据使用的模板
int postMsgId = 0; //记录已经post了多少条
Ticker tim1; //这个定时器是为了每5秒上传一次数据
/*------------------------------------------------------------------------------------------*/
WiFiClient espClient; //创建网络连接客户端
PubSubClient mqttClient(espClient); //通过网络客户端连接创建mqtt连接客户端
//连接WIFI相关函数
void setupWifi()
{
delay(10);
Serial.println("连接WIFI");
WiFi.begin(WIFI_SSID.c_str(), WIFI_PASSWD.c_str());
while (!WiFi.isConnected())
{
Serial.print(".");
delay(500);
}
Serial.println("OK");
Serial.println("Wifi连接成功");
}
//重连函数, 如果客户端断线,可以通过此函数重连
void clientReconnect()
{
while (!mqttClient.connected()) //再重连客户端
{
Serial.println("reconnect MQTT...");
if (connectAliyunMQTT(mqttClient, PRODUCT_KEY, DEVICE_NAME, DEVICE_SECRET))
{
Serial.println("connected");
}
else
{
Serial.println("failed");
Serial.println(mqttClient.state());
Serial.println("try again in 5 sec");
delay(5000);
}
}
}
// mqtt发布post消息(上传数据)
void mqttPublish()
{
if (mqttClient.connected())
{
//先拼接出json字符串
char param[32];
char jsonBuf[128];
sprintf(param, "{\"LEDSwitch\":%d}", digitalRead(LED_B)); //我们把要上传的数据写在param里
postMsgId += 1;
sprintf(jsonBuf, ALINK_BODY_FORMAT, postMsgId, ALINK_METHOD_PROP_POST, param);
//再从mqtt客户端中发布post消息
if (mqttClient.publish(ALINK_TOPIC_PROP_POST, jsonBuf))
{
}
else
{
Serial.println("Publish message to cloud failed!");
}
}
}
//收到set主题的命令下发时的回调函数,(接收命令)
void callback(char *topic, byte *payload, unsigned int length)
{
if (strstr(topic, ALINK_TOPIC_PROP_SET))
{
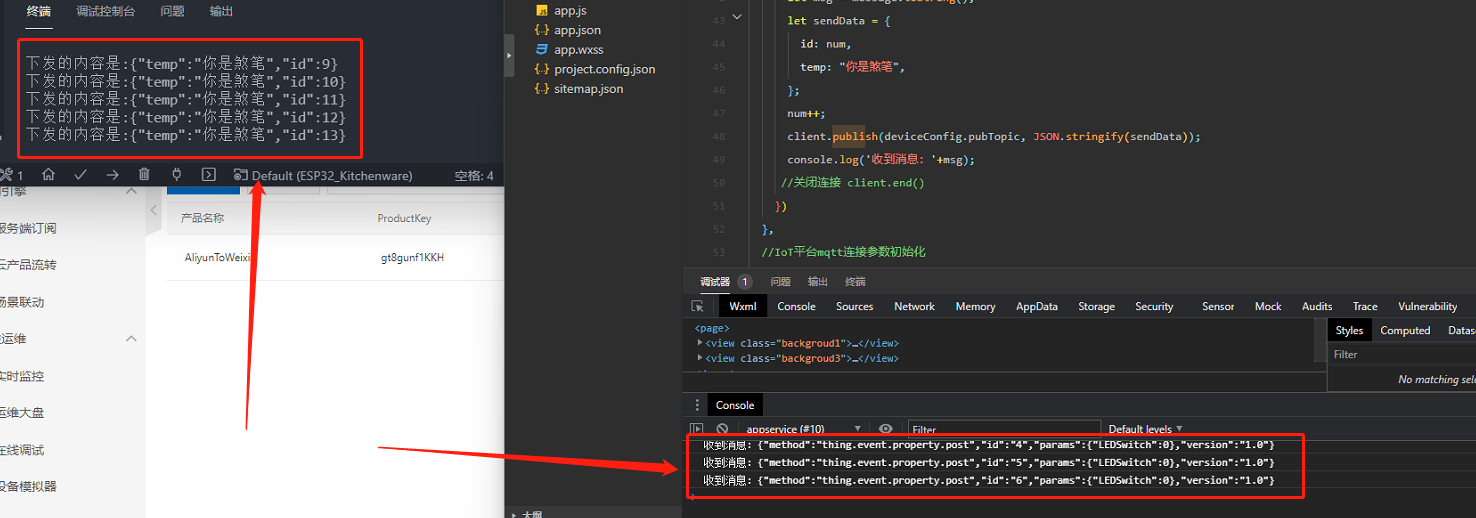
Serial.print("下发的内容是:");
payload[length] = '\0';
Serial.println((char *)payload);
}
}
void setup()
{
pinMode(LED_B, OUTPUT);
Serial.begin(115200);
delay(2000);
setupWifi();
if (connectAliyunMQTT(mqttClient, PRODUCT_KEY, DEVICE_NAME, DEVICE_SECRET))
{
Serial.println("MQTT服务器连接成功!");
};
mqttClient.subscribe(ALINK_TOPIC_PROP_SET);
Serial.println("订阅成功");
mqttClient.setCallback(callback); //绑定收到set主题时的回调(命令下发回调)
tim1.attach(5, mqttPublish); //启动每5秒发布一次消息
}
void loop()
{
//检测有没有断线
if (!WiFi.isConnected()) //先看WIFI是否还在连接
{
Serial.println("WiFi not connected");
setupWifi();
}
else //如果WIFI连接了,
{
if (!mqttClient.connected()) //再看mqtt连接了没
{
Serial.println("mqtt disconnected!Try reconnect now...");
Serial.println(mqttClient.state());
mqttClient.subscribe(ALINK_TOPIC_PROP_SET);
Serial.println("订阅成功");
char param[512];
sprintf(param, "aaa");
mqttClient.publish(ALINK_TOPIC_PROP_POST, param); //这个是上传数据的topic,jsonBuf这个是上传的数据
// mqttClient.subscribe(ALINK_TOPIC_PROP_SET);//这个就是引用开始定义的topic 订阅topic
clientReconnect();
}
}
// mqtt客户端监听
mqttClient.loop();
}
在
1 | std::string WIFI_SSID = ""; // wifi名 |
都修改成自己的数据,ALINK_BODY_FORMAT是需要发送的数据,发送的时候会转换成JSON格式。
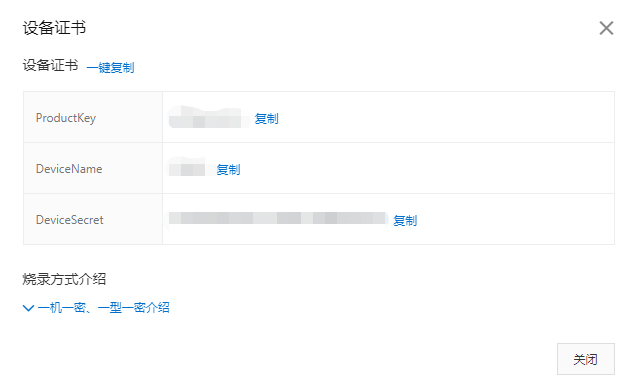
然后在阿里云上查看这些信息,填上即可。
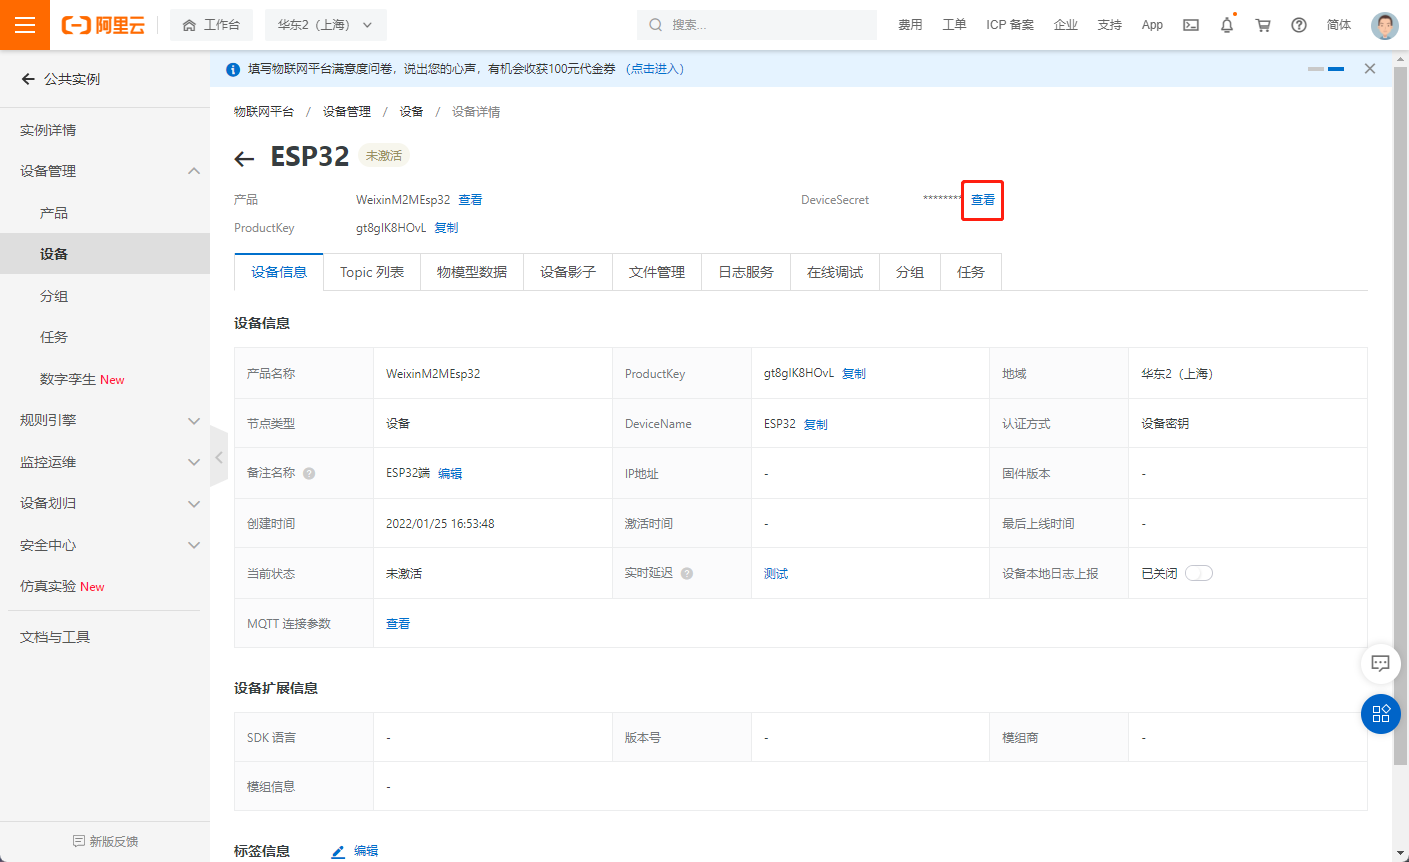
然后烧录代码就可以连上阿里云了,连接上后会显示设备在线
06 微信小程序连接阿里云
微信小程序端需要将hex_hmac_sha1.js和mqtt.min.js放入utils中。这两个文件直接联系我获取或者在网上找,基本上都是通用的。
1 | var mqtt = require('../../utils/mqtt.min.js') //根据自己存放的路径修改 |
按照上一步一样填写然后编辑即可。
07 规则引擎进行Topic间交换
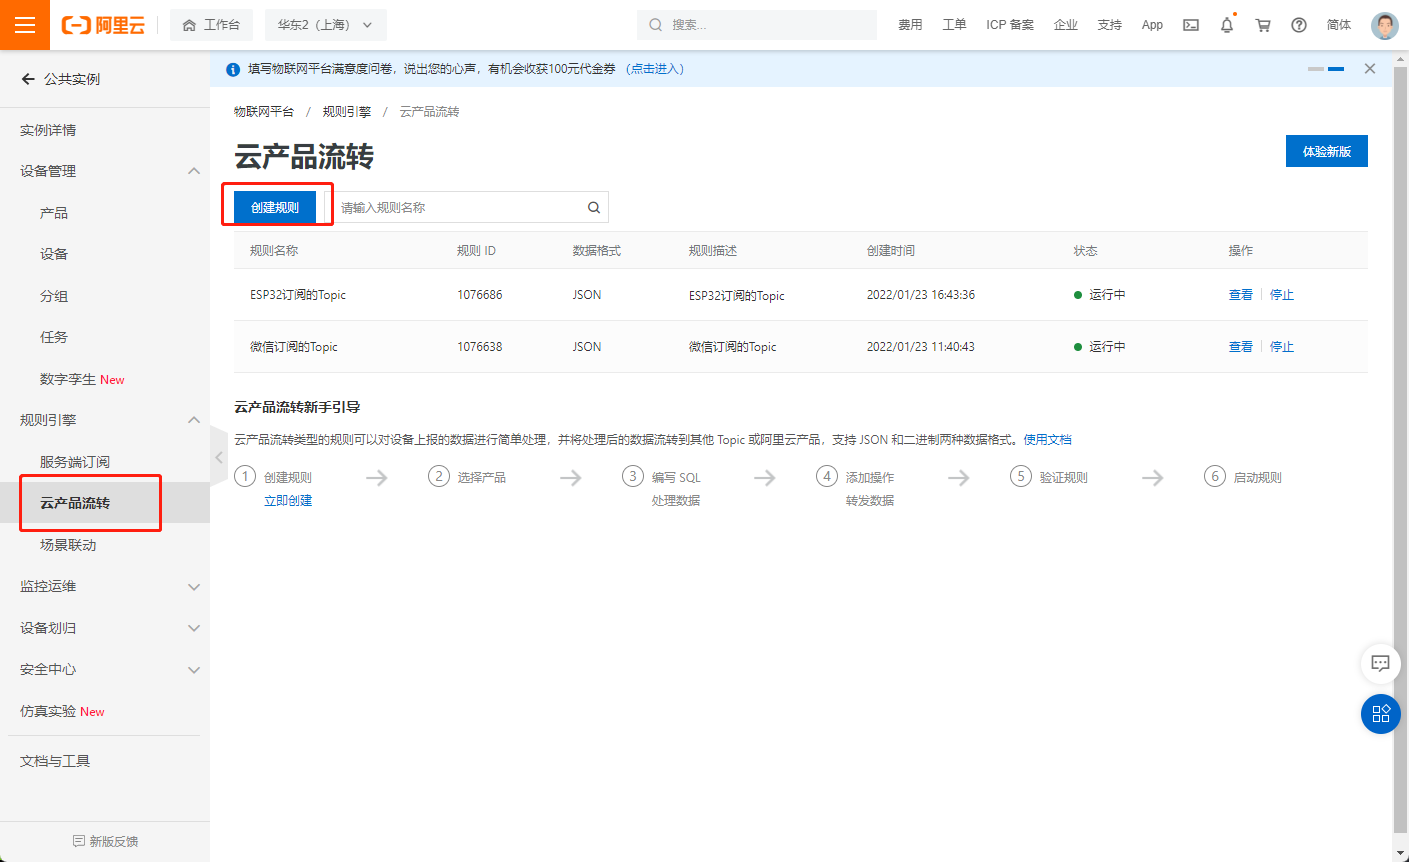
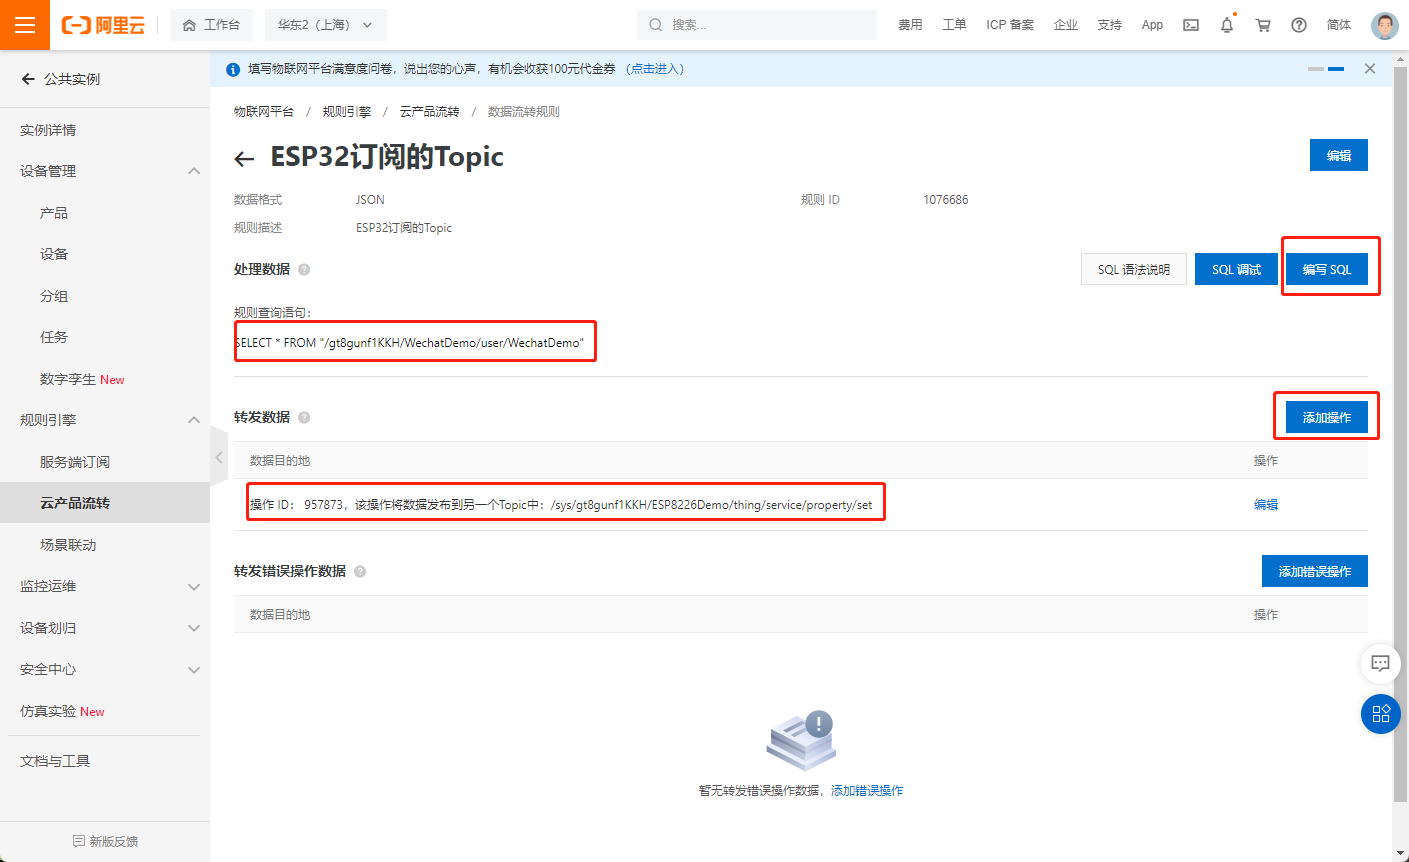
编写SQL和添加操作,上面的是要从哪里获取,下面是发送到哪里。
添加完就行了。
08 相互通信示例